Showing posts with label wedding. Show all posts

Friday, April 6, 2012

DIY Wedding Veil

Photo by Lindsey Friar Photography


I made my own veil for the wedding. If ever you've stopped in a bridal shop and seen the prices of some of their veils, you'd probably understand that I didn't want to pay as much for a veil as I did the entire dress. And really, it's something you wear for maybe 15 minutes, depending on the length of your ceremony, then ditch for the rest of the event. (As it is common to remove the veil after the ceremony and any photographs your photographer may hold you over for.)

I don't have any pictures from actually making it, so forgive me. The process is really quite simple, however. I'll try to explain it best I can, but I have a habit of muddling the explanation.

I already had plenty of lace that my mother's been hanging onto for years and years and years. Bolts of it. "Veil-y" material is pretty cheap, I bought a couple yards. Wasn't sure how much I was going to want (or how many times I was going to mess up.)

First, you're going to need one of these.


A wide one is good. That'll keep it more secure on your precious little head. I bought mine somewhere around the bridal section at Jo-ann. There were two of them in a pack. There are other ones at Hobby Lobby and the like, but they were short ones and made of metal. I didn't like those because I'd had a few metal wire ones before and they get bent all out of shape.

Then, you'll need these sorts of things...


You'll cut the material to the shape of the veil you want. I wanted a fingertip length veil, but two layers, although I wasn't concerned with wearing the veil over my face. (It could have, though. I just wasn't keen on wearing it that way. Something about not liking roots of traditions.)

I had a rough measurement from about the crown of my head to fingertippish and doubled that to account for two layers.

I cut out a rough rectangle that length and just "some" width. (I would best describe it as my width plus a little extra. That way it would drape around me. I know, totally unspecific. This whole thing was done by improvising.) The corners were rounded out.

I then cut enough lace to go around the entire perimeter of this rectangle. It was a lot. Just... a lot.

If your lace looks like this...
That is to say, has raw edges and things... You'll want to trim it down first.


Using a white thread..., although one could easily use a clear/invisible thread. I didn't have any on hand. ... Using a white thread, I just stitched the entire length around, attaching the edge of the lace to the edge of the veil. I got tired after going around it once, so I didn't finish like I planned to and do both edges of the lace. It looked fine.

After the lace was all attached, I folded it almost in half. Not evenly, otherwise both layers of the veil would be the same length. It's offset several inches so the top layer is shorter. I gathered it all up at the fold and ran a thread through it to hold it in place, adjusting it to the width of the aforementioned haircomb.

When attaching it, make sure you're attaching it to the TOPSIDE of the comb with the length of the veil hanging down in the direction all the prongs are pointing.

I left a slight bit of overhang at the top to fold over to completely hide the comb. Again, taking a white (or invisible) thread, weave over the veil and comb, around it, and between the prongs. Go from one end of the comb to the other, then back again for extra security.

I made this awesome illustration to show you how.

Once it's all secure, you're done! You could also attach beads or pearls or little flowers. However you want to embellish it.

It looks way longer than it seems.

Some detail of the lace.

Just to prove it can be flipped over the face, here's another:
Photo by Lindsey Friar Photography

Sunday, April 1, 2012

Errr... Yeah, those reviews.

Lindsey Friar Photography

Wal-Mart specialty cakes:

We went ahead and went with a wedding cake from Wal-Mart. Just picked one of the ones from the book, same colors, etc. Chocolate cake, vanilla buttercream. Three tiers. No silly topper. Came out to be something like $124, half of which was put down as a deposit the day we ordered it. We ordered it something like a week or two before the wedding. It was ready for pick-up the morning of.

It looked very nice. It wasn't dry, as some people complain of with storebought cakes. The frosting wasn't bad either. I trimmed down a dozen roses to stick into the top. Also didn't look that terrible.

My photographer will have to forgive me, but I'm posting photos she took. :P
Lindsey Friar Photography

It was tasty and we enjoyed it. It was PLENTY big enough for our small wedding. Thanks, Wal-Mart. Even if the girl who took our order was a bit of a grump. :)

So:
Tasted good
Looked good
Didn't need a long advance order
Was ready morning of the wedding
Cheap
I do recommend this, especially if you're not looking to drop $200+ on a cake.


Flowers from FiftyFlowers.com:

My mother said I could order $200 worth flowers. Yeah, that doesn't seem like a lot to some people. That's okay, because I didn't really want a lot of flowers.

 Mini Calla Lilies
Carnations

I ordered both of these, set to deliver two days before the wedding to my parents' house which I had the time to head down there before my class that day to accept the order.

Well, the calla lilies arrived. Within about 5 minutes, (enough time for me to rip into the box), I received a phone call from a representative saying that I'd have my order that morning (Already had it!) and to notify me that the carnations got held in customs(!!) and would arrive the next day. Grrreeaaattt.... Luckily, I was able to leave a note before I had to rush off for a family member who would be home during the next day to accept my order and prep the flowers for me to work on that night. They did arrive and they were taken care of, so all's well. Unexpected things do happen and I'm not silly enough to think otherwise. :)

20 Calla lilies isn't a whole lot. I know they were minis, too, but still smaller than I anticipated. I wound up not using most of them, so it was kind of a waste. A shame, too, because I really wanted them.


The carnations were great. It's a combo pack of four different shades of purple - 20 of each - which turned out fantastic. I had plenty to make the bouquets (four. Mine, two bridesmaid bouquets, and a throwing bouquet which didn't get used because I said, "Here put this in the fridge" to my maid of honor and she put it in the freezer and didn't realize until it was frozen solid hahahaha. <3)

I also just picked up a random bouquet of flowers and baby's breath from Wal-Mart to fill in with. Lilies, daisies, roses, the like. So glad I did.


Not a great picture and doesn't do them all justice, but it's all I was able to get. Was kind of busy.

I also made boutonierres (Ended up hating the ribbon ones I made). Making bouquets and bouts was an interesting experience, since I've never done anything like that before. One of the people hanging around the house that day (guest of my brother's) asked me where I learned to do this stuff. "Hahaha, I have no idea what I'm doing."


So:
Easy ordering
Unexpected delay on half of order
Calla lilies not quite what I expected
Carnations were great and a hardy flower
Well packaged, nothing wrong with flowers
Also packaged with care instructions

Still, despite the holdover in customs, I would recommend FiftyFlowers. They were prompt on communication, flowers were good quality.

Friday, September 9, 2011

Things To Come?

With my RSVP rant out of the way... I'm finding that planning a wedding is not that easy - I didn't expect it to be anyway. I have no prior experience with any of this, nor do any of my friends. I am kind of winging this entire process as I go along, and I don't think I'm doing that bad. (Or that great, necessarily.)


Tablecloths were ordered and came in - It was cheaper to buy them compared to renting.
Napkins were ordered and came in - I got 11" cocktail napkins because I didn't want the giant dinner ones.
"The dress" has long since been acquired. New suit also acquired.
Bridesmaids dresses ordered (If my maid-of-honor actually put in her order)
Wine either done or on its way to being done. While I'm not big on alcohol at all, I thought the wine would be acceptable because it's homemade by my parents. :) Niagara, Concord, a mix of both, and some kind of mixed berries one.

I need to make my veil. I want to make my veil. I'll get around to that eventually. I bought the material for it already - it's just a matter of doing it.

I've been bouncing around on wedding favour ideas and think I've finally settled on one. I am going to make jam/jelly with my mother. Strawberry jam from strawberries my parents picked, and blackberry if there are some blackberries from my parents' garden that escaped the wine wrath. We have adorable 4oz canning jars ready for this project. It's all very personal, the wine and the jams. And the centerpieces if that idea goes through.

My intent is ordering flowers online to ship two days before the wedding and prep them all myself.

As for a cake, I'm leaning towards a Wal-Mart wedding cake. (Did you know they do specialty cakes?) My only problem with storebought cakes overall was the awful whipped frosting, but for the wedding cakes, you get the option of buttercream frosting. Yes, please. As long as the cake looks and tastes good, it doesn't matter where it's from. In the end, that's all that matters. There's no reason to spend $500 on a cake. (Especially when that would be more than twice what my dress cost! Hah.)


I plan to do a review of both where I order the flowers from and of the cake. That is my intent, anyway.
I want to get as much prepped the two days before the wedding so I'm not spending that entire morning freaking out. Best laid plans of mice...

RSVPs, what's up with that?

Another post already. I just wanted to get something out that it seems the general populus doesn't get.

RSVPs.

In the grand scheme of life, it may not matter much... but in wedding planning, it's a big deal.


That card and return envelope aren't packaged in the invitation just for looks. The couple and/or wedding planner would sincerely like for you to fill it out and return it. It doesn't take long and it saves a lot of grief if you do it. It provides something tangible for whoever is planning to see that you are attending and it's the same little card everyone else (in a perfect world) sent back, too. Whether or not you are able to attend, it's a courteous gesture to return the response card - even if you're not 100% sure you can make it. It may be better - at least in my case - to go ahead and say you'll be there, then call back later if your plans fell through. It's more stress to say you're not able to make it, have them plan for you not being able to make it, then show up at the wedding when no one is expecting your bright face there.

Knowing who and how many guests are coming to the wedding is a big part of the planning process, directly tying into the financial aspect. This is especially true if the couple is planning an affair that charges per guest. This may include using the venue and more likely if they are having dinner catered and served. Ordering too much is a waste and not ordering enough is ridiculous.

If there is going to be some sort of assigned seating, they'll need to know who is coming so they can seat people who don't clash by each other. You surely don't want to sit by Uncle Bob and Aunt Janet, do you?... Or how about Grandma Agnes? Remember how much you hate when she pinches your cheeks? And you're 35?

Even if you don't want to pay the million dollar postage that's holding you back, a thoughtful phone call or e-mail would be more appreciated than no response at all. The last thing the bride wants to think is that these people she invited to share in her special day want nothing to do with her, hate her or her husband-to-be, think she smells, ....

I, and every bride out there, would kindly like to ask you to respondez s'il vous plait.


Edit: I forgot to address the whole plus one issue. Receiving an invitation does not automatically entitle you to bring along a date or friend. Again, it ties directly into finances. Whoever is paying for this wedding may not have endless pockets to pay for every guest and that guest's guest. It is fair enough to reason that they budget for who received invites. Typically, family and bridal party can bring guests. The bride and groom would also typically be considerate enough of people who are in serious, involved relationships to not leave out the significant other. Everyone else, like Flaky Jane who has one week flings, is not necessarily going to be "allowed" to bring a guest.

One sure-fire way to be sure you can bring a guest is if you receive an invitation addressed to you "and guest". Another way is if you're unsure whether or not you're allowed to bring a guest... ask! It's better to ask than just assume you are!

Monday, May 16, 2011

More Stamping and Things

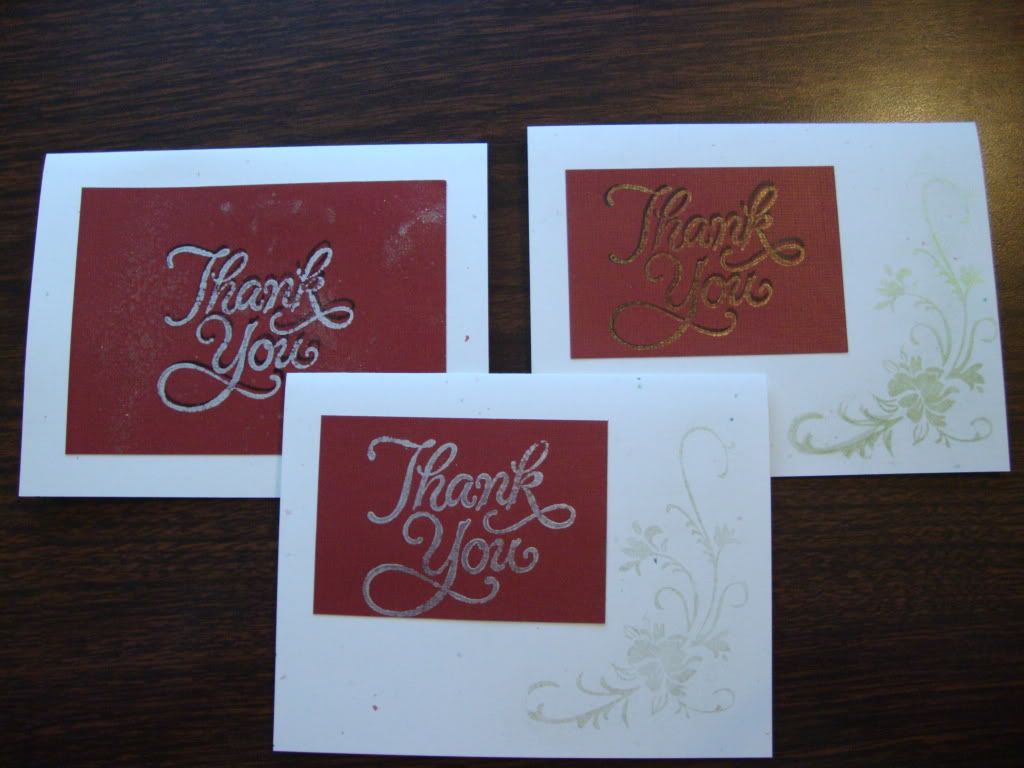
Even though we still are not remotely close to the wedding, I find myself thinking about Thank You cards now. I wanted to do more rubber stamping with those to go with the invitation suites I am going to make, so I picked up a Thank You stamp to play with.

Though it was just quick playing around, with no real idea of what I wanted to do. My silver ink is kind of blotty it seems. I only remembered after using black that I had gold/silver inks, so I stamped over the black and it looks like some weird drop shadow. For my wedding thank you cards, I'd of course use a cardstock that matches our colors, instead of this dark red. The stamping I was just seeing how I could use up white space if I used 1/4 of the cardstock sheet instead of half as I did in the left card.


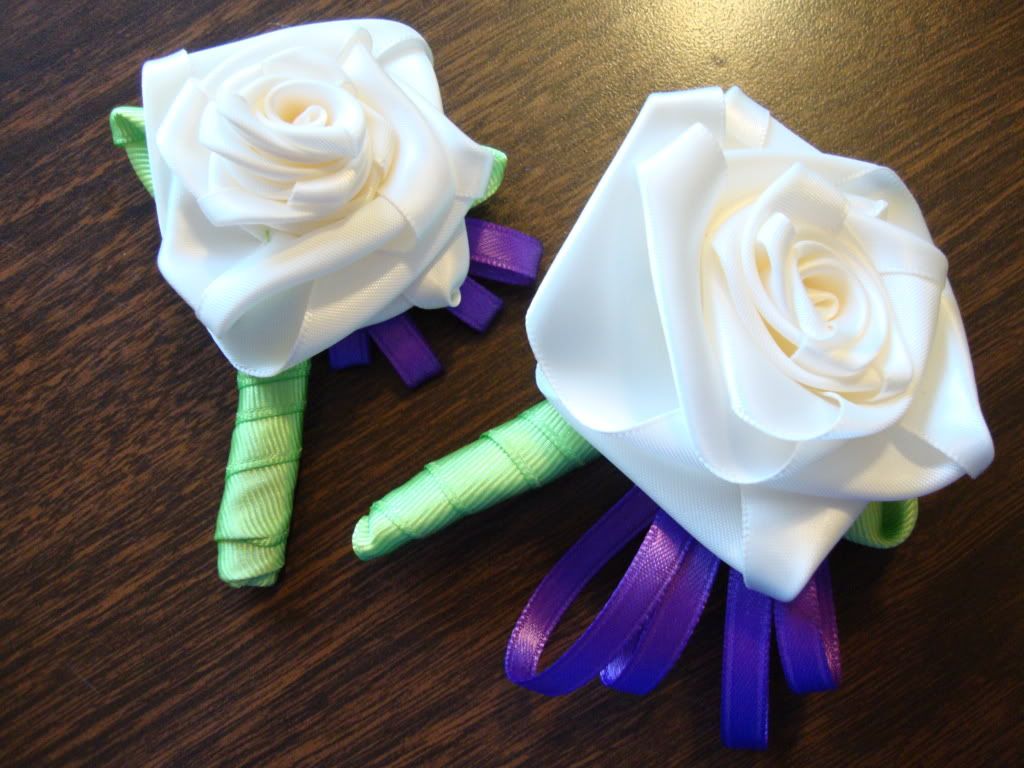
I added in purple to my boutonnieres though!

I'm probably going to remake my boutonnieres [and matching corsages, assuredly] with different ribbon because I won't be able to find any that matches the color I had for these and I need more than what I had. It's about one yard of ribbon to make one rosette and the spool I bought to play with was only three yards.

I did manage to stumble upon the wedding area of Hobby Lobby and found all the little bits and pieces for bouts and corsages and things. Little sparkly sprigs of happyface. I'm going to have to go back sometime, but I just can't decide what I want to work on first. I want to do anything and everything I can for my own wedding, because I want to put my own two hands to work on whatever I can. Except the cake. And dress. Those are the only two things I don't want to make. Maybe bouquets, too. I can't decide if I want fresh flowers or silk - I'm an immense packrat as it is, so either way...

Centerpieces, corsages, boutonnieres, appropriate gifts, invitations, thank you cards.... the list grows.

Tuesday, May 3, 2011

First Blood

There's some battle wounds, here. There's a spider living somewhere in or on my desk that keeps making appearances and has lost a few legs in the process every time I throw something at it. Also, first blood has been drawn so it's on now, wedding. You and me. Pinpricks are not friendly and, much like papercuts, have a lingering pain no one likes.

I'm still trying to just come up with ideas for things to work on this summer. I made some ribbon roses a few weeks back from some sort of off-white satin ribbon, then tried it with some purple organza ribbon I found I don't like quite as much. I want to try and make boutonnieres, which is proving a little more difficult than I first assessed.

Just killed the spider after weeks of waging war. Victory!

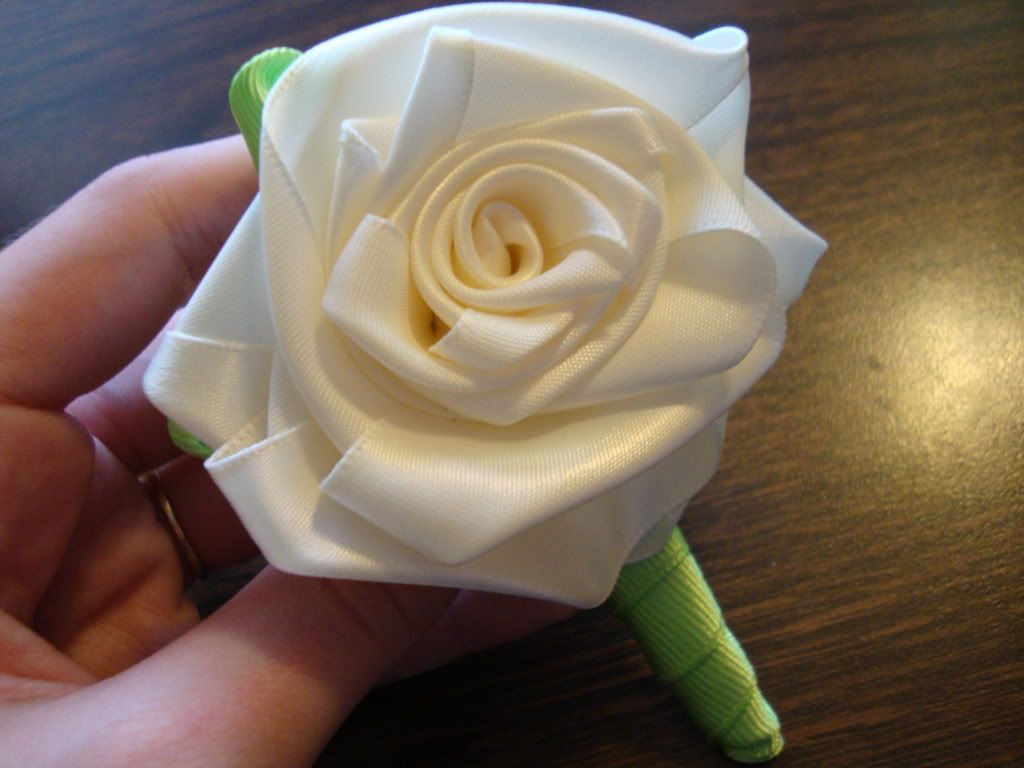
 Tonight, I finally did a little more than just the rose and tried to add the [technical term incoming] "stem thingy".

It's really more impressive in person?
I left a "tail" when making the rosette and improvised making the stem part with a piece of paper on my desk by folding it up, wrapping the tail around it and stapling it. I used a grosgrain ribbon in lime green and wrapped it around the paper stem-majigger. I also flipped it a couple times at the top in back for "leaves". I hand-stitched it all to keep it secure and came up with this mess. I don't hate it. I just want to figure out a way to work in some...thing... purple without over-doing it.

Should I figure out a "proper way" to do this, with replicable results, I want to make a full set - groom, best man (I doubt we'll go beyond into groomsmen), father of bride, and father of groom. I also want to make matching corsages for the lady counterparts, but that will be figured out later. Haha.


I did manage figuring out how I wanted my invitations done and the lovely lad agrees, so I'll be actually making those later on. Invitation, direction card, RSVP and matching RSVP & mailing envelopes lined in a pretty-pretty purple paper.

Tuesday, April 19, 2011

Stamping Adventure

Rubber stamping. It's not something I ever really dabbled with. However, I got the idea into my head that I would much rather make my wedding invitations instead of have them made. All the more tempting to try something I've never done, huh?

I managed to get out to Hobby Lobby this morning with my beau in tow, har har har rhyme. We (that is to say, I) looked at primarily the stamps.
----As an aside, Stampabilities/Paper Studio stuff is 50% off. That was double sweet.
I did a little "research" beforehand and decided to use just clear stamps, because being clear, I could easily see where precisely I was stamping. Picked up a couple interesting stamp packs and a giant acrylic block.. ....And ten different ink pads, because of the above mentioned sale. I picked up embossing powder too, but am at a lack for a heat gun (They were sold out today. Booooo!).

If you've never used clear stamps yourself, they're silicone (I think) stamp designs and you peel them off of the plastic sheet they come on. Then, you position it how you want it on a clear acrylic block. The silicone just adheres to the acrylic on its own, so you can peel it and change it around how you want to. After you're done, you just peel the stamp off, wash it with soapy water or stamp cleaner, and then put it back on the plastic sheet. I think they're pretty cool.

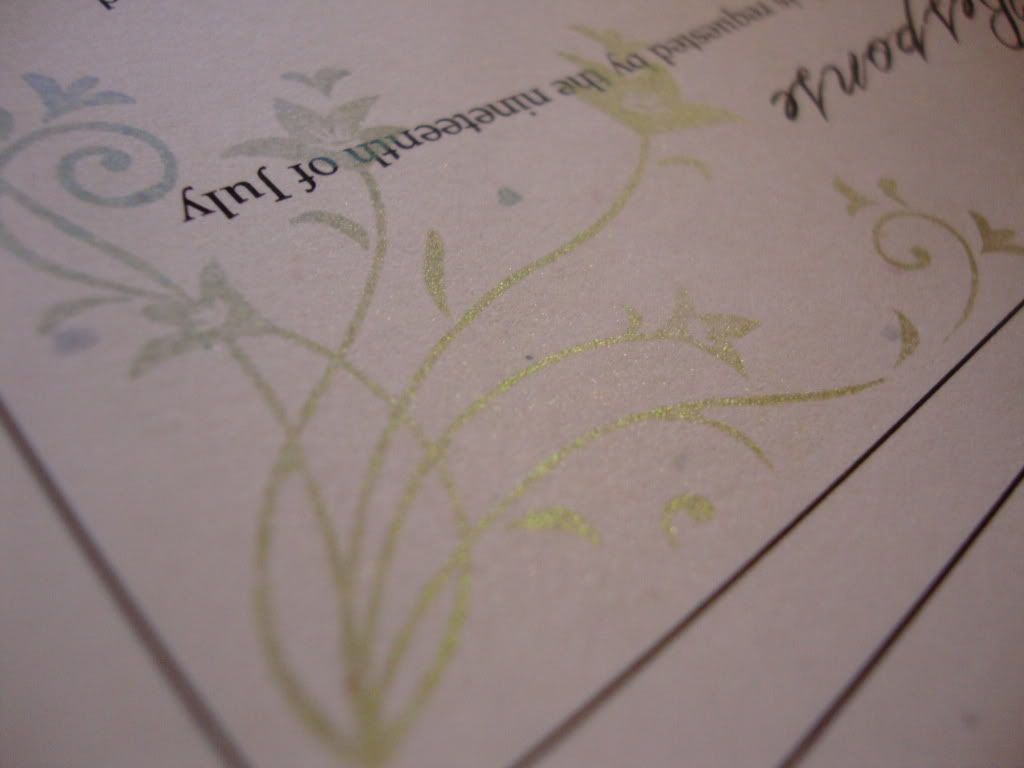
I spent most of the evening playing with my new toys. I stumbled upon a pretty neat sort of watermark-like effect that uses Pearl-Ex powder. I already had some metallic green Pearl-Ex from using it with my polymer clay, so it was great.

You need embossing ink and Pearl-Ex powder. You load up your stamp with the embossing ink, stamp the paper, and before it gets too dry, brush on some powder with a paintbrush. It's kind of like magic if you use a clear embossing ink, so the image just "magically appears" when you run the powder over it and it adheres to the ink.


Incidentally, the gradient in this photo is due to the reflection of my monitor on the Pearl-Ex. However, you can achieve something very similar if you brush on different colours of Pearl-Ex before the embossing ink dries.


I also found this cardstock I liked at Office Max, called "Stardust". It's flecked with little colored bits. I still have to find preferably a dark purple cardstock.


I just wanted to share. ^_^ I'm just glad I get to sink some time into making things soon.